Hello Everyone!
If you’ve been following my blog the last few weeks, then you’ll know that I recently uploaded a post all about how I take my bookstagram photos, advice for new bookstagrammers and how I get my inspiration. I thought a good follow up to that post would be this one, which is going to be all about I actually edit my bookstagram photos and the apps/software I use to do that! My aim with these posts is to show that it isn’t all that scary or difficult to start a bookstagram as many people might think and that you don’t have to have all the fancy equipment that some people have or their perfectly aesthetic bedrooms. I talked about a lot of that in my previous bookstagram post, so I recommend you go and read that first and then come back to this one, so it makes a little more sense. So, let’s just get into it shall we…?
Organise the files
The first thing I do when I’ve finished taking photos is take them off my camera and organise them on my computer. I am a photographer and therefore take my photography pretty seriously, so I make sure all my photos are stored in 2 places in case one should fail and I have separate folders for RAWS and JPEGS. If you aren’t a photographer like me though and you are just taking photos on your phone, then don’t worry about this. If you are using your phone then maybe put your book photos in a separate folder in your camera role and just back them up on google drive or whatever you have because you can never be too safe.
If you are looking to get into photography more seriously (even if it is just book photos), then I suggest you do move your photos to your computer and try organising them in dated folders. I create a new folder for every photoshoot and I name it after the date a took the photos. For example, if I took some photos on the 6th of September, I would name the folder ‘0906’. You should always put the month first if naming them like this, so that they actually stay in chronological order and create another folder for each year as well when you get to that point. You don’t have to take organising folders quite this seriously if you don’t want to, but if you are going to be storing them on your computer then it is a good idea to get organised now to save you a lot of hassle down the line.
Choose Favourites
Once you taken and organised all your photos, you have to choose your favourites. This personally can take me quite a while because I have a habit of taking about 20 of the same photo ‘just in case’ and because the slight change of angle really can make all the difference. This part is really up to you though, so just go through them and pick which ones you like the best!
Editing
This is the bit everyone wants to hear about! I know some people spend hours editing really extravagant bookstagram photos, but I’m not one of those people. I do some simple edits to my photos to enhance them and give them all a similar look, which helps them all fit together.
I personally use Adobe Photoshop, but I know many people don’t have access to that as an Adobe subscription is very expensive. I’m fortunate enough to have a Dad that works in the IT department at a fancy school, which means we get a lot of things for free or greatly discounted, but I know most people don’t have the privilege. Nothing I do on Photoshop is very complicated though and you can get exactly the same look on a phone app that I will tell you about in a minute. For now let me just tell you the general presets that I use when editing photos:
I always use adjustment layers in Photoshop instead of just editing the photo directly (this is called non-destructive editing, but that is a fancy photography term, so don’t worry about that) because I think it gives you a little more control over your edits. I always add a ‘Brightness and Contrast’ layer and a ‘Vibrance’ layer and then I adjust the sliders accordingly.
Generally speaking this is the way the sliders are set:
Brightness: 16
Contrast: 36
Saturation: -57
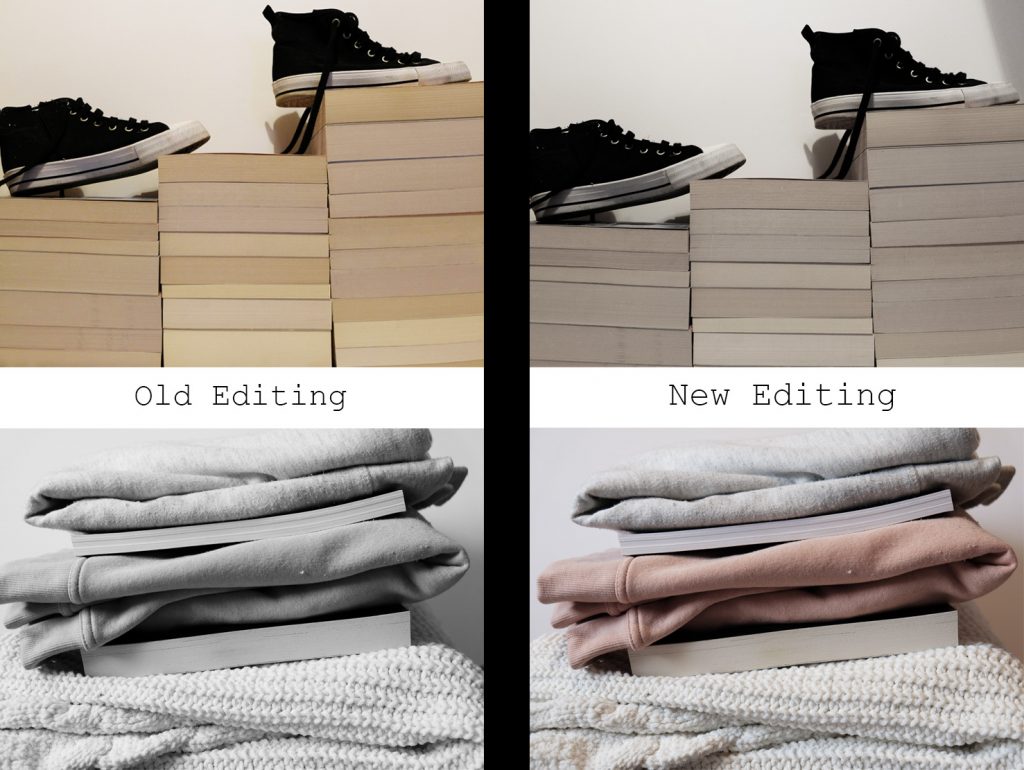
This is my personal preference because I prefer bright, pastel pictures because I am really not a huge fan of colour at all – I always say my favourite colour is grey! Your preferred look may be completely different to mine and that is absolutely fine, but I thought I would share my very simple presets in case anyone really liked my editing style and wanted to edit very similarly, so do feel free to use them! Please don’t worry if your photos aren’t turning out how you imagined at first or how other people’s look because you WILL improve with time and the chances are that the person you admire has been doing this for years. Their photos probably sucked once too! I’ve even put together this example for you of a couple of my old photos that I posted and how I would edit them now. I don’t think the old edits are necessarily bad, but they aren’t my style anymore.

These presets change occasionally if the lighting was bad the day I took them or if the book I photographed had a particularly bright coloured cover, but it is always just pulling the existing sliders up and down depending on what needs adjusting. This is honestly all I do to my photos though, so it really is very simple and I will tell you all about how to get the same look without Photoshop now….
Without Photoshop
If you don’t have Photoshop, then I HIGHLY recommend you getting Snapseed on your phone. Snapseed it completely free, so all you have to do is download it and it has the same functionality as Photoshop. You actually have more control over editing your photos in this app, in a lot of ways because there are so many more sliders to choose from and you can add text, add filters, change the style of the image, use the healing brush, lens blur and so much more. Snapseed really is an AMAZING app and a lot of professional photographers are now using to edit their photos when they are on the road because it really is that great! So please don’t worry if you don’t have Photoshop and even if you do, I still suggest you download Snapseed because it is great for editing Instagram story’s or holiday pictures too!
Save them in Order
This step doesn’t really apply if you are just using your phone, but if you are saving photos on your computer, I recommend that you rename each photo in the order you want to post them. Planning your feed can sound a little vain, but it is such a small thing that can make all the difference to a pretty feed vs an awkward feed (I can do a whole post on planning your feed if you want, so let me know down below!).
I just name my photos ‘photo 1’, ‘ photo 2’ etc, so I know what order I’m posting them in. I know you can get apps that do this too, so if you are using your phone or just want an app, then you can easily find a feed planner by just searching the app store for ‘Instagram feed planner’. I personally don’t have an recommendations since I don’t use one, but I know there are loads out there and you can probably find recommendations from others with a quick google search too!
App Recommendations:
The final thing I wanted to talk about before I leave you for today is a few of my favourite photo editing apps that I use, so let’s just get straight into them
Snapseed – We’ve already talked about this, but seriously just get it because it is so amazing and FREE!
Pixlr – I don’t use this one all the time, but it is incredibly useful when if i want to add overlays, borders or filters to photos. I don’t do this very often, but I do use it for my Instagram stories a fair bit and there is also some great fonts on there!
Phonto – This app can be a little tricky to get your head around at first, but I swear by this app when it comes to creating Instagram stories to promote blog post, Youtube videos or even just general aesthetic posts. As I said, this app isn’t very self-explanatory, but I can totally do a video tutorial or something similar on it if anyone would be interested?
Those are the only 3 apps that I use regularly, but I thought I would give an honourable mention to ‘Instant’ and ‘Boomerang’ because I do use those occasionally as well. ‘Instant’ is an app that adds a polaroid border to any photo and gives you lots of custom options for said border, but you do have to pay for it and I’m sure you can find another way to do that (I’m just a little extra and like to have separate apps 😂). I think we all know what Boomerang does, but I just thought I’d mention it because I do like a good boomerang every now and then!
So that is how I edit my bookstagram photos! It is very simple and I know my style won’t suit anyone, but I hope this post was helpful in one way or another, whether that be the presets, the app recs or just some reassurance that you don’t have to be amazing straight off the bat. Do you have a bookstagram? I’d love to know, so leave a comment down below or come and chat to me on mine: @theoriginalbookdragon
Goodbye for now!
Over and Out


Leave A Reply